> For the complete documentation index, see [llms.txt](https://docs.solarvis.co/llms.txt). Markdown versions of documentation pages are available by appending `.md` to page URLs; this page is available as [Markdown](https://docs.solarvis.co/project-design/create-a-project/battery.md).
# Battery
The page lets you define your battery strategy by choosing between self-consumption, autonomy, and arbitrage operating modes, and automatically calculates the appropriate battery size for the project.
## Purpose of This Page
This page is used to add and configure a battery system within a PV project.
It allows you to define the battery’s role in the system, either to increase self-consumption or to provide backup power during grid outages.
Based on the selected use case and preference inputs, solarVis automatically calculates the required battery capacity and proposes suitable battery systems.
The results are based on an **hourly simulation** that compares solar production and site consumption and determines when the battery should charge or discharge.
Battery calculations express **state of charge limits**, **efficiency losses**, and **charging/discharging power constraints** to reflect realistic system behavior.
All inputs on this page directly affect:
* Required battery capacity (kWh)
* Self-consumption and grid dependency
* Backup performance during outages
* Energy flow outputs and system behavior simulations
* Electricity cost savings and bill reduction
* Long-term financial metrics such as return on investment
* Recommended battery products and system configuration
## What You Can Do Here
On this page, you can:
* Enable or disable a battery system for the design
* Select the battery operating mode: **Self Consumption**, **Autonomy**, **Arbitrage**
* Adjust your target values, such as self-consumption rate and autonomy level
* Configure how an arbitrage battery charges and discharges against the time-of-use tariff
* Reserve part of the battery capacity for backup with **Enable Backup Reserve**
* Include battery pack replacement in the long-term financial calculation
* Add an AC-coupled battery with a **Power Charge Controller (PCS)** when the inverters cannot host one
* Let solarVis automatically size the required battery capacity or choose the battery manually
{% hint style="info" %}
By comparing different battery capacities, you can clearly see their impact on the system performance and easily choose the most suitable solution for your project.
{% endhint %}
* Review the recommended battery system and select a matching product
{% embed url="" %}
## Battery Preferences
Battery sizing and behavior are defined through a set of preferences that depend on the selected use case.
### Use Case Selection
You should select **one** of the following battery operating modes:
* **Self Consumption** (On-grid projects)
* **Autonomy** (Zero injection projects)
* **Arbitrage** (On-grid projects with a time-of-use tariff)
{% hint style="info" %}
In off-grid projects, calculations are based on autonomy by default. The use case selection is hidden because there is no other option for off-grid systems.
{% endhint %}
The selector only lists the modes that fit the design's grid connection type. A mode that exists but cannot be used, for example, **Arbitrage** on a design with a zero-injection connection type, is shown disabled with a tooltip explaining the reason.
The selected use case determines:
* Which input fields are shown
* How battery capacity is calculated
* How the battery is operated in simulations
#### 1. Self Consumption Mode
This mode focuses on increasing the share of generated solar energy that is consumed directly at the facility.
In this mode, the battery stores excess PV production during the day. It discharges the stored energy later when on-site consumption exceeds solar generation.
> It will be seen on **On-grid projects.**
{% hint style="info" %}
The battery is operated within a usable capacity range of 10% to 90%.
{% endhint %}
**Targeted Self-Consumption Rate (%)**
Set the percentage of self-consumption you want to achieve with a battery system.
The panel displays:
* Current self-consumption rate without a battery
* A slider to define the desired target
SolarVis calculates the battery capacity required to store surplus production and reach the selected target.
{% hint style="info" %}
This mode is commonly used for:
* Reducing electricity bills
* Increasing solar utilization
* Improving energy independence without full backup requirements
{% endhint %}
#### 2. Autonomy Mode
This mode is designed to increase the level of energy independence by maximizing how much of the total consumption is covered by solar production and battery storage.
> It will be seen on **Zero injection projects.**
{% hint style="info" %}
The battery is also operated within a usable capacity range of 10% to 90% in this mode.
{% endhint %}
**Targeted Autonomy Rate (%)**
Set the desired autonomy level for the project.
The panel displays:
* Current autonomy rate without a battery
* A slider to define the target autonomy rate
Autonomy represents the percentage of total electricity demand that can be supplied by the PV system and battery without drawing energy from the grid.
SolarVis calculates the required battery capacity to reach the selected autonomy target, considering:
* PV production profile
* Consumption profile
* Daily and seasonal energy balance
{% hint style="info" %}
This mode is commonly used for projects aiming to minimize grid dependency rather than focusing only on backup scenarios.
{% endhint %}
#### 3. Arbitrage Mode
Arbitrage mode uses the battery against the electricity tariff: it charges when electricity is cheap and discharges to serve the site or sell to the grid when it is expensive.
> It will be seen on **On-grid projects** whose tariff has time-of-use period prices.
#### Strategy
Defines how the charge and discharge decisions are made:
* **Optimal dispatch**
A rolling-horizon optimiser decides when to charge and discharge based on tariff prices, production, and consumption. You can set the **Forecast horizon** (2–48 hours, default 8) and optionally enable **Include opportunity cost**, which adds a per-kWh wear and opportunity cost to grid charging so the battery only charges from the grid when the arbitrage benefit exceeds this cost.
* **TOU-based**
You mark the charge and discharge hours yourself on a 12-month by 24-hour grid with separate **Weekday Schedule** and **Weekend Schedule** tabs, using the **Charge**, **Discharge**, and **Erase** paint tools. The tariff's period prices are shown on the grid so cheap and expensive hours are easy to spot. A suggestion is auto-filled from the tariff, and **Auto-fill from tariff** re-derives it at any time; editing the grid switches the schedule to manual.
#### Max Grid Import Power and Max Grid Export Power
Optional caps on the AC power the battery draws from the grid and exports to the grid. Leaving a field empty uses the battery's maximum power.
#### Backup Reserve
Backup power is configured with the **Enable Backup Reserve** switch, available in the Self Consumption and Arbitrage modes.
When enabled, the **Backup Percentage (%)** slider (10–90%, default 50%) reserves that share of the battery capacity as a minimum state of charge:
* The battery does not discharge below this level while connected to the grid, so the reserve stays available for outages
* The remaining capacity is used by the selected operating mode
#### Battery Replacement Cost
Turn on **Enable Battery Replacement Cost** (available in the Self Consumption and Arbitrage modes) to include battery pack replacement in the 20-year simulation and in the battery payback calculation.
* **Replacement cost**
The total cost of one replacement event for the whole battery pack, with its **Currency**. Required when replacement is enabled.
* **Replacement trigger**
Choose what triggers a replacement:
* **Fixed year**: Replace the pack once at the start of the chosen **Replacement year** (1–20, default 10)
* **Cycle count**: Replace the pack when it reaches the set number of **Equivalent full cycles** (default 4000); this may trigger multiple replacements over 20 years
* **Capacity threshold**: Replace the pack when its state of health falls to the set share of nominal capacity (10–100%, default 70%)
## Selected System
After defining battery preferences, solarVis calculates the required battery capacity and displays suggested battery systems.
For each suggested option, you can review:
* Total battery capacity
* Expected self-consumption rate
* Expected autonomy
* Backup duration with solar energy support
You can:
* Accept the suggested battery system
* Manually select a different battery model
* Compare alternatives before applying the system
{% hint style="info" %}
Once applied, all energy, financial, and performance calculations update automatically.
{% endhint %}
{% hint style="info" %}
#### Power Charge Controller (PCS)
A battery normally connects through the project's inverter, which means the design needs at least one **Hybrid** or **Off-Grid** inverter. When it has neither, solarVis reports that the battery is not compatible with the inverters in the project and offers a **Power Charge Controller (PCS)** instead.
A PCS is an AC-coupled unit that sits alongside the existing inverters, so an on-grid design can take a battery without replacing them.
**PCS Conversion Efficiency**
The one-way AC/DC conversion efficiency of the controller, entered as a percentage.
This loss is applied to both charging and discharging in the simulation, on top of the battery's own round-trip efficiency, so the energy and financial results reflect the real cost of the AC-coupled configuration.
{% endhint %}
## Battery Impact Overview & Performance Visualization
After a battery is selected, the platform provides a **visual performance summary** to illustrate how integrating a battery system affects energy usage, backup capability, and electricity costs when compared across different system configurations.
> The project connection type can be set to **on-grid, and zero injection to see these charts.**
### Key Performance Indicators
At the top of the page, summary indicators provide a quick overview of system performance based on the selected battery strategy.
#### Yearly Average Self-Consumption
This indicator shows the proportion of solar energy that is consumed directly on-site over the course of a year.
* It reflects how effectively the system minimizes electricity exported to the grid.
* The value increases as battery storage allows excess solar energy to be used later.
* It is influenced by load behavior, PV production, and battery operation strategy.
#### Backup Time (With Solar Energy Contribution)
This metric represents the estimated duration during which the system can supply power to critical loads during a grid outage while solar generation is available.
* The value is derived from battery capacity, critical load definition, and expected solar energy contribution.
#### Backup Capacity
This indicator reflects the energy (kWh) available from the battery's backup reserve during a grid outage.
* When **Enable Backup Reserve** is on, it follows the configured backup percentage.
* Otherwise, a typical battery management reserve of about 10% of the total capacity is assumed.
#### Payback Period
This indicator shows how long it takes for the battery investment to be recovered through bill savings, displayed as years and months.
* The battery investment includes replacement costs when **Enable Battery Replacement Cost** is configured.
* Savings are the difference between the bill with solar only and the bill with solar and battery.
* The value is capped at 20 years when the investment is not fully recovered within the simulation horizon.
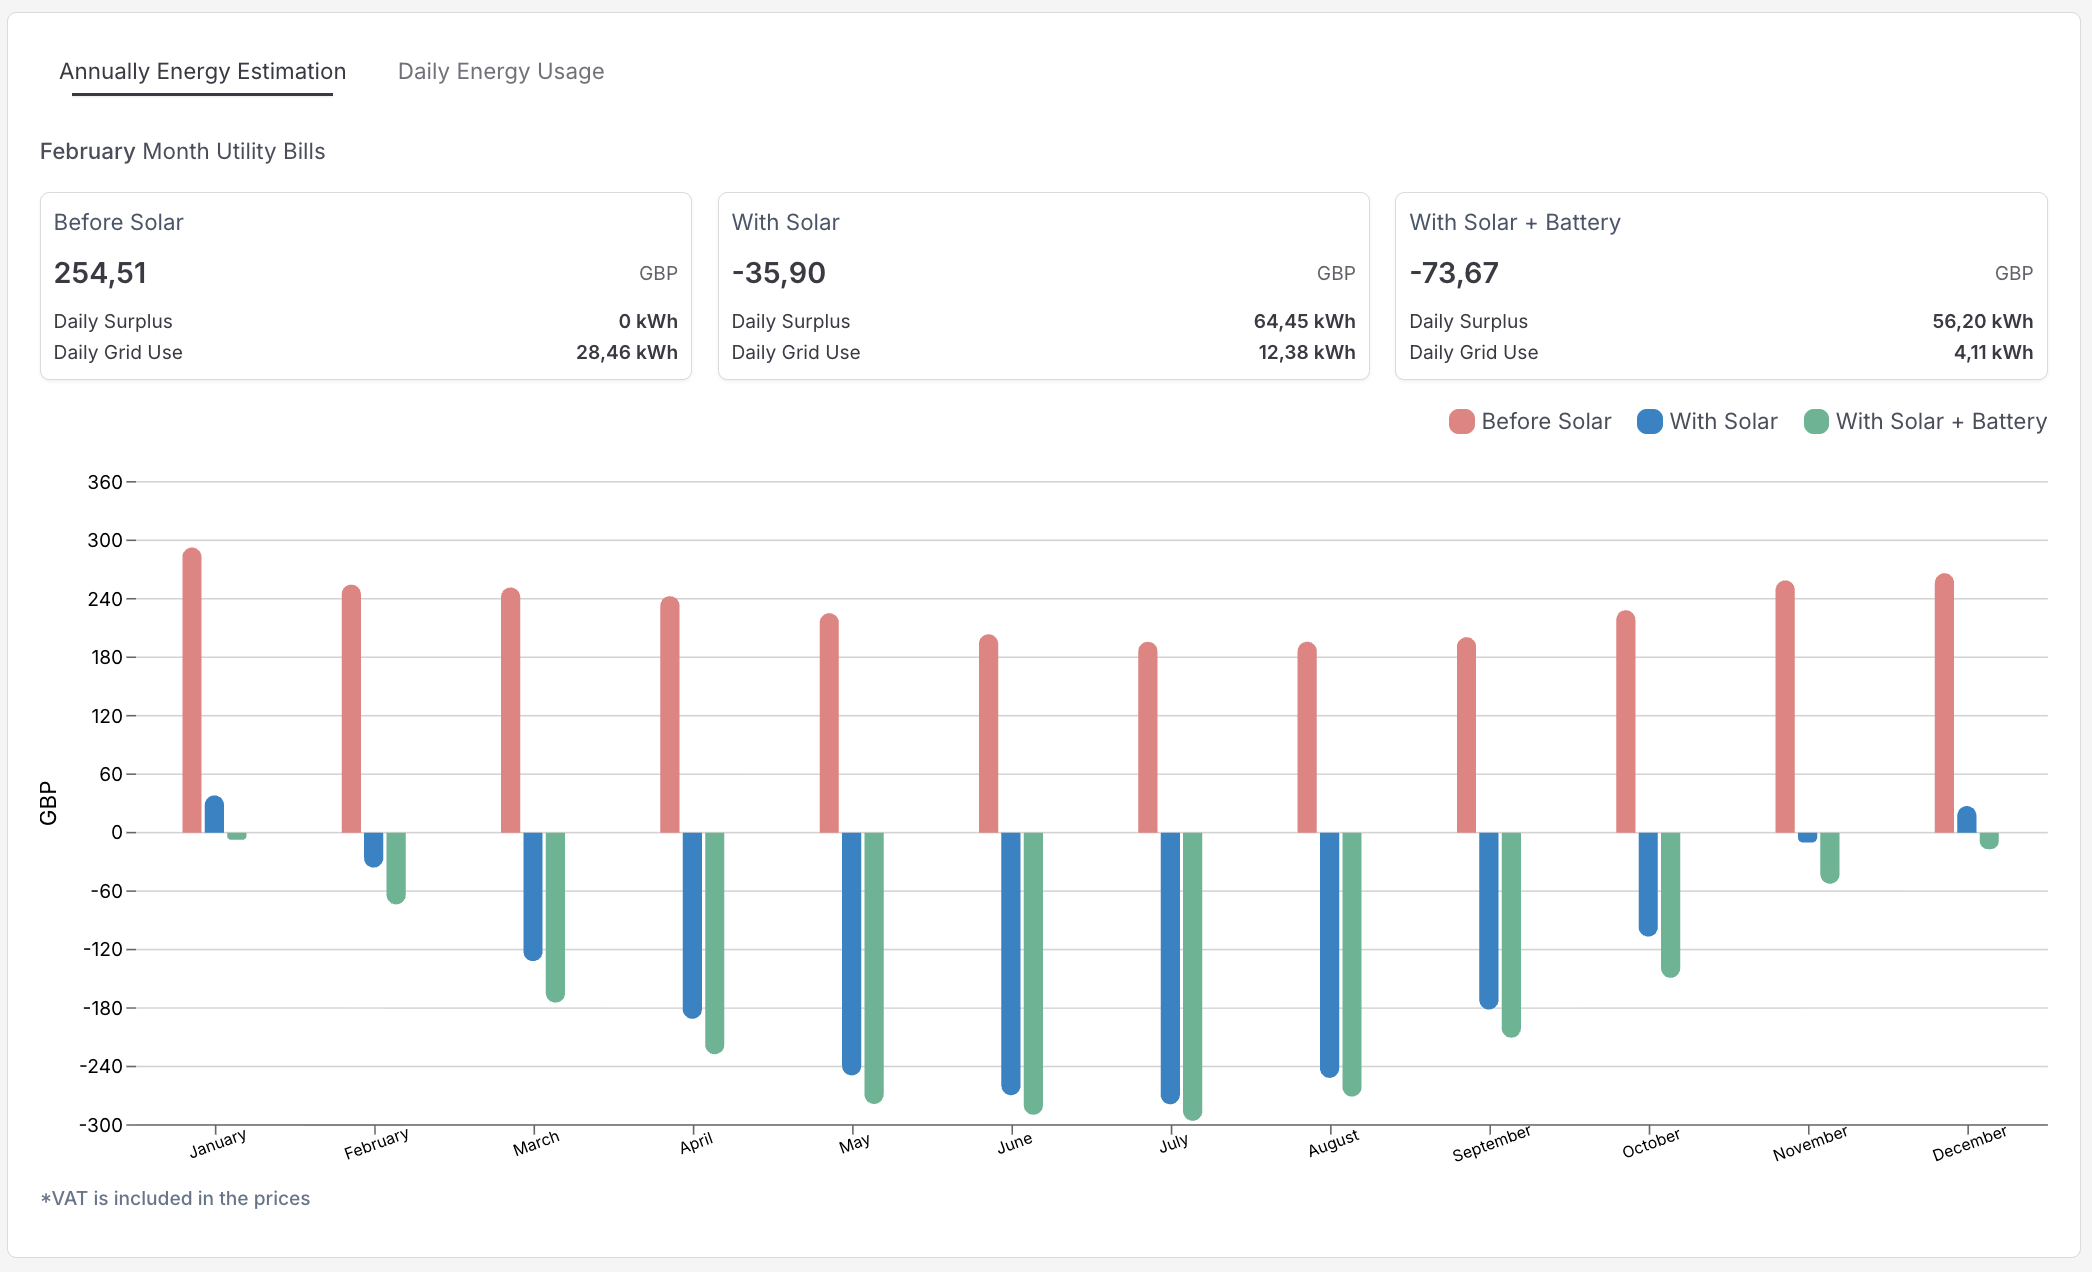
### Annual Energy Estimation Chart
This visualization highlights how battery storage enhances both self-consumption and cost efficiency.
The visual chart comparison of electricity cost behavior across the year. Each month is displayed with three comparative values:
* Cost without solar energy
* Cost with solar energy only
* Cost of both solar energy and battery
This view allows users to understand how energy generation and storage influence grid dependency and financial outcomes over time.
#### Monthly Utility Bill Comparison
For each month, a detailed breakdown is shown for the different system configurations.
**Before Solar**
This scenario represents full reliance on the grid, with no on-site generation or storage.
* All electricity is purchased from the utility
* No surplus energy is produced
**With Solar**
This scenario shows the effect of adding PV generation.
* Grid consumption is reduced
* Excess energy may be exported
* Costs change depending on seasonal production
**With Solar + Battery**
This scenario demonstrates the added value of energy storage.
* A larger share of solar energy is consumed on-site
* Grid usage is minimized both outside solar production hours and by storing solar surplus in the battery instead of exporting it to the grid.
* Financial performance becomes more stable across the year
{% hint style="info" %}
The battery’s contribution to the financial performance may vary depending on local regulations.
{% endhint %}
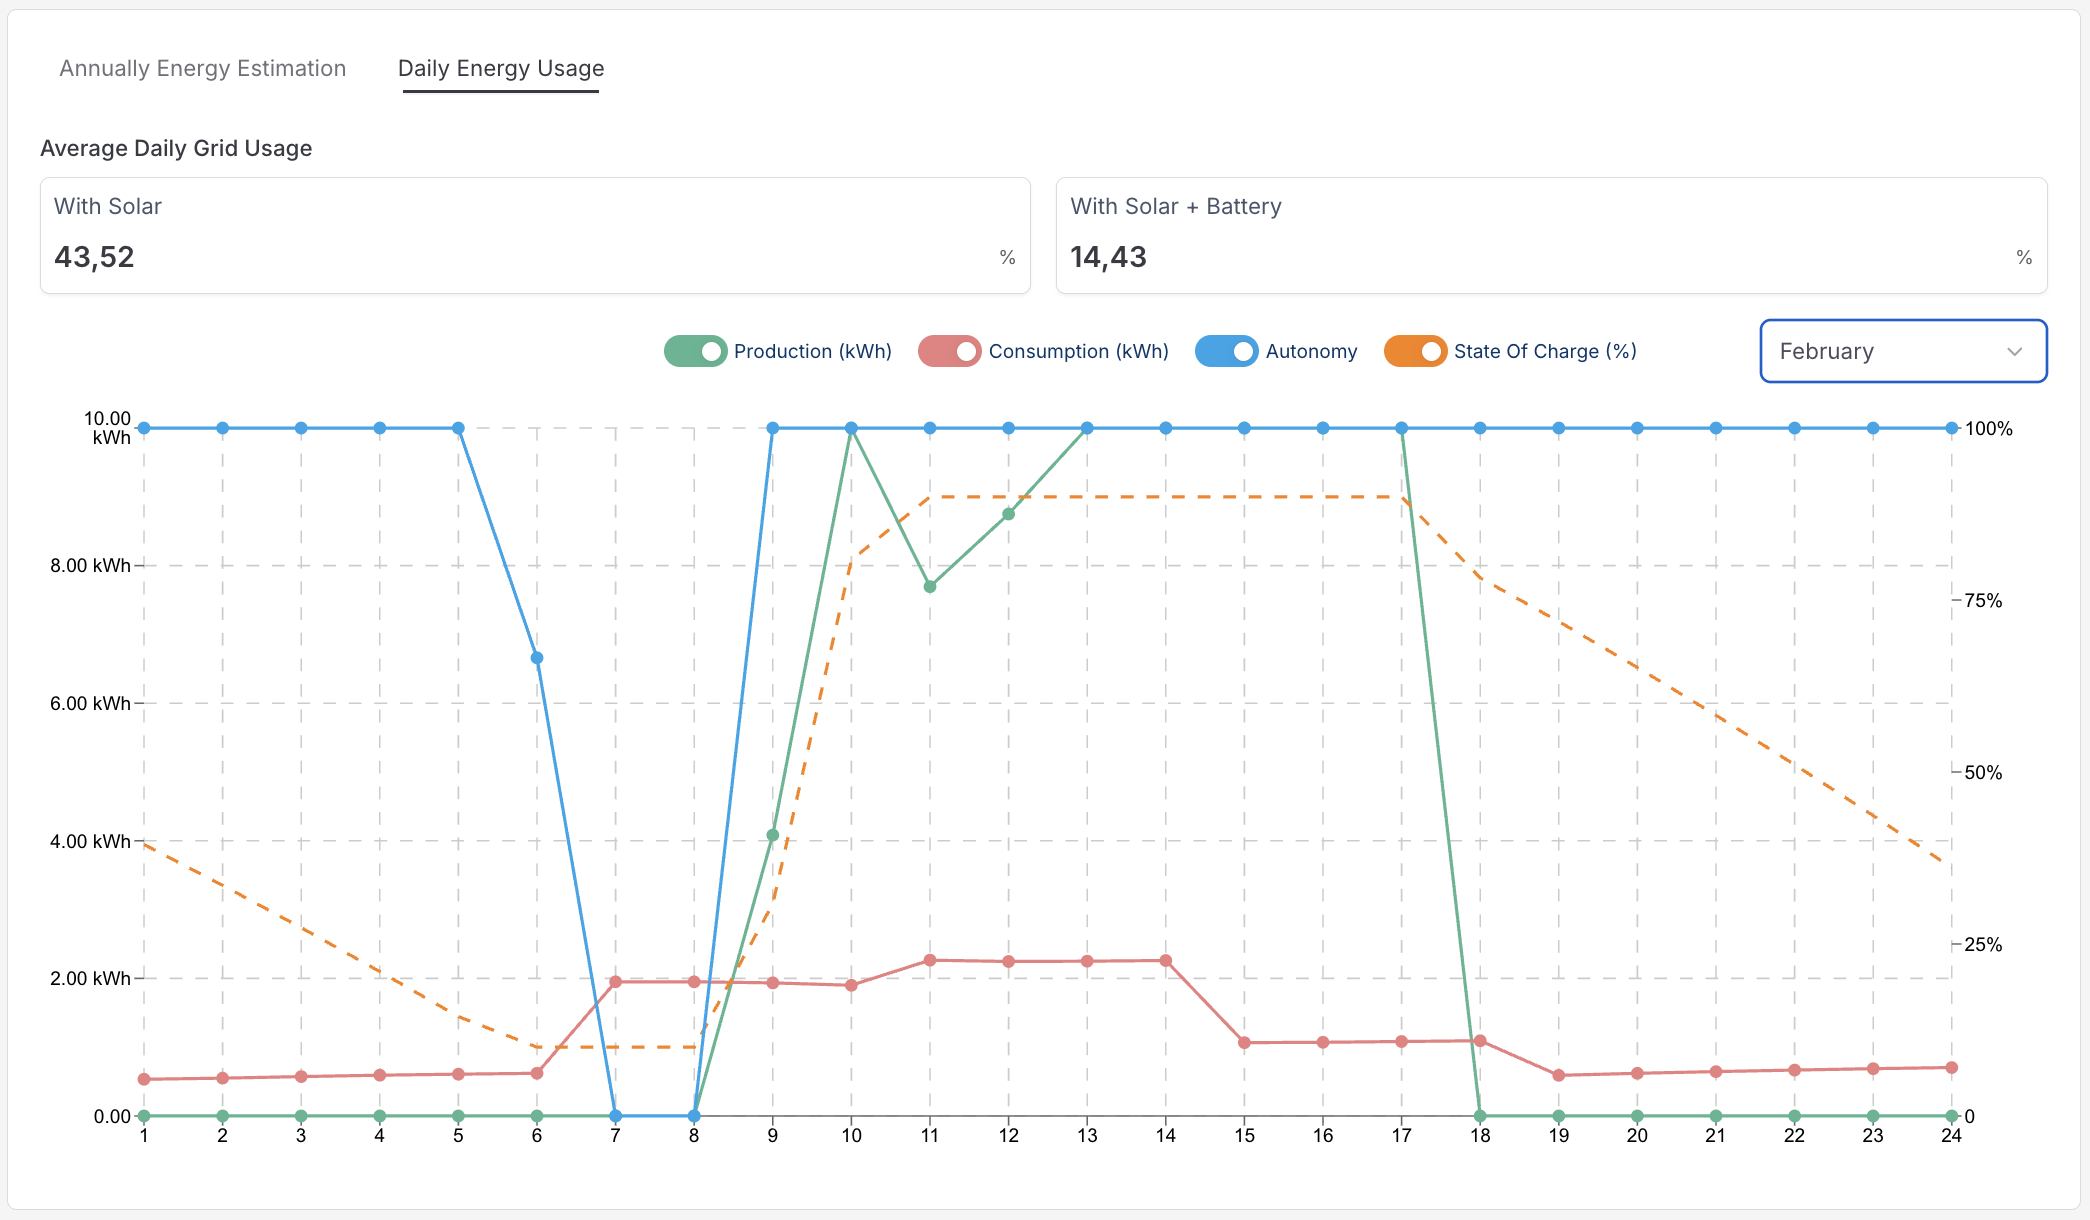
### Daily Energy Usage Chart
This section visualizes how energy is produced, consumed, stored, and supplied throughout an average day of the selected month.
The chart shows the selected month's average day: each hour is the average of that hour across all days of the month for both production and consumption, and the battery is simulated on these averaged profiles with the design's operating mode. This makes the daily curves representative of the whole month instead of one sampled day.
The chart combines multiple energy indicators to illustrate system behavior at each hour:
* **Production**
Represents the solar energy generated during the day.
* **Consumption**
Shows the site’s electricity demand throughout the day, reflecting typical usage patterns such as daytime activity and evening demand.
* **Autonomy**
Indicates whether the site is being supplied by on-site energy sources (solar and battery) rather than the grid. Higher autonomy means lower grid dependency at that hour.
* **State of Charge**
Displays how full the battery is over time. It increases when excess solar energy is stored and decreases when the battery supplies energy to the site.
#### Monthly Selection
The month selector allows you to view how daily energy behavior changes across different seasons.
This helps illustrate:
* Seasonal variation in solar production
* Changes in battery usage patterns
### Energy Flow
The **Energy Flow** tab shows an annual energy-flow diagram between **Solar PV**, **Grid**, **Site**, and **Battery**, together with an **Energy Flows** table listing each flow with its yearly value and a short description:
* Solar to Site, Solar to Grid, and Solar to Battery
* Grid to Site and Grid to Battery; grid charging typically happens during cheap tariff hours in arbitrage operation
* Battery to Site and Battery to Grid: battery energy sold back to the grid when export is allowed
> The Grid node is hidden for off-grid designs.
### Cashflow
For on-grid designs, the **Cashflow** tab plots the battery's financial performance over 20 years: per-year net cashflow, the battery's upfront costs, replacement costs for the years the pack is replaced, and the accumulated cashflow line.
{% hint style="info" %}
When the battery investment is included in the return-on-investment calculation, battery replacement costs are also reflected in the overall solar payback period and the cumulative cashflow of the project.
{% endhint %}
### Key Insights from the Charts
* Shows when solar energy is consumed directly, stored in the battery, or supplied back to the system on an hourly basis
* Illustrates how grid dependency increases or decreases throughout the day and across the year
* All values are based on the same hourly simulation used for system sizing, savings calculations, and performance analysis
* Makes backup readiness and system resilience clearly visible
* Shows how energy storage improves both operational performance and financial outcomes
{% hint style="info" %}
**Off-Grid Connection Type + Battery**
When an **off-grid** connection type is selected, the Battery page reflects a fully independent system without grid support.
In this mode:
* All consumption must be covered by **solar production and battery storage**
* Energy deficits indicate periods where usable production is insufficient
The visualizations emphasize **usable production, consumption balance, and energy deficit**, helping evaluate whether the system can operate reliably without a grid connection.
{% endhint %}
***
## Related Pages
* [Project Details Page](/project-design/create-a-project/project-details.md)
* [Consumption Page](/project-design/create-a-project/consumption.md)
For more assistance, don’t hesitate to [get in touch.](https://www.solarvis.co/en/company/contact)
---
# Agent Instructions
This documentation is published with GitBook. GitBook is the documentation platform designed so that both humans and AI agents can read, navigate, and reason over technical content effectively. Learn more at gitbook.com.
## Querying This Documentation
If you need additional information that is not directly available in this page, you can query the documentation dynamically by asking a question.
Perform an HTTP GET request on the current page URL with the `ask` query parameter, and the optional `goal` query parameter:
```
GET https://docs.solarvis.co/project-design/create-a-project/battery.md?ask=&goal=
```
`ask` is the immediate question: it should be specific, self-contained, and written in natural language.
`goal` is optional and describes the broader end goal you are ultimately trying to accomplish on behalf of the user. GitBook uses it to tailor the answer towards what is most useful for that goal.
The response will contain a direct answer to the question and relevant excerpts and sources from the documentation.
Use this mechanism when the answer is not explicitly present in the current page, you need clarification or additional context, or you want to retrieve related documentation sections.